Have you been looking for a simple way to implement high availability for your web application? Amazon Web Services provides the entire foundation for achieving true aws high availability, but implementing the features properly requires specific knowledge of how to bring each service together.
This post is here to help. It is an end-to-end guide to implementing true high availability for your web application using AWS. We will also walk through an actual software example.
Introduction to High Availability on AWS
Amazon Web Services (AWS) offers a wide range of services that we can leverage to implement High Availability (HA) to any web application that we deploy on the AWS cloud. The intention for this post is to go over the DevOps model where the requirement to take it aws high availability from a single Elastic Compute Cloud (EC2) instance to be deployed into an Auto Scaling (AS) group which will be linked to an Elastic Load Balancer (ELB).
The importance of following the DevOps model is to make sure the application has changes made appropriately so that the operations will not get affected when any particular instance gets terminated or when a new instance has been added to the group to serve. To achieve this we will need to make sure the database is hosted outside the instance preferably in an AWS Relational Database Service (RDS). We should also make sure that the application service is configured such that the service starts up as soon as the instance is launched.
Purpose of high availability for web applications
This is to achieve High Availability for any web application (in this case SwiftCode) deployed in AWS with a focus on aws high availability. The following features will be present:
- High availability across multiple instances/multiple availability zones.
- Auto Scaling of instances (scale up and scale down) based on the number of requests coming in
- Additional Security to the instances/database that is in production
- No impact to end-users during the newer version of code deployment
- No Impact during patching the instances
Advantages of using high availability for web applications on AWS
Following are the advantages of the model discussed in this post:
- No public internet traffic will be routed directly to the instance thus eliminating any kind of security threats
- Only users who have access to the Bastion host can access the instances in the VPC
- Security Groups and Network ACLs can be used to define who can access this privately
- Upgrades of the application such as the deployment of a new feature can be done without the current existing users experiencing any issues during this window.
- Patching of the instances where the application is running can be easily done by just terminating them and spawning a new instance as every new instance comes with the latest updated software
- Instance hardware failure can be avoided as Auto Scaling automatically detects this and launches a new instance in case this happens.
- Auto Scaling/ELB also has health monitors that detect Zone failure and launch new instances in a healthy zone until AWS restores the failure Zone to a healthy state.
- Metrics in the Cloud Watch service can be customized so that we can monitor the application based on the number of users using the application or also the memory consumed by the particular instance.
AWS Services used to achieve high availability
These are the services we’ll use in this example:
- EC2 – Elastic Compute Cloud
- AWS RDS – Relational Database
- AS – Auto Scaling
- ELB – Elastic Load Balancer
- SNS – Simple Notification Service
- VPC – Virtual Private Cloud
- Route53 – DNS service
- AMI – Amazon Machine Image
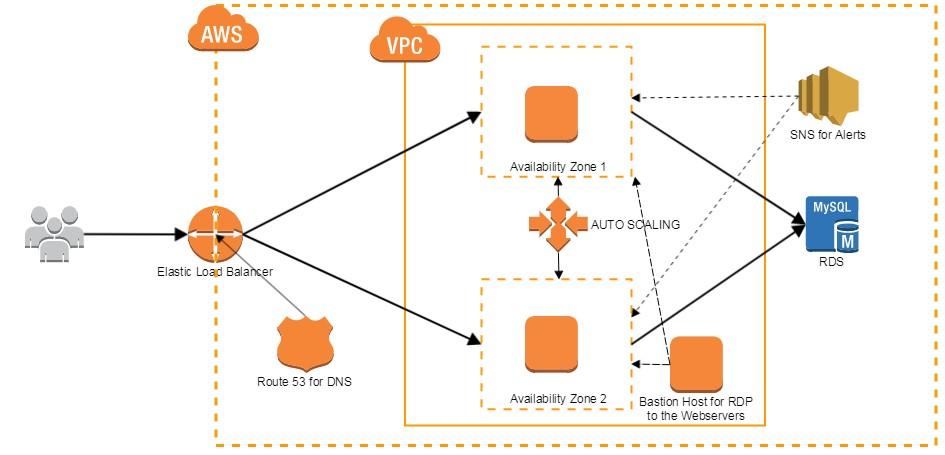
A high-level diagram of Amazon Web Services high availability model
Here’s a look at how the various components come together:
Implementation of high availability on AWS
Implementation of any application (in this case SwiftCode) into HA involves both development and operations. This DevOps feature requires an AMI (Amazon Machine Image) to be created from a stopped instance that holds the application.
This has been divided into two parts:
- Dev
- Ops
Dev:
The below content describes how you can initiate any application or process when a system has started. This applies to local Linux machines and Linux servers. The script that we cover in this document will be executed when a machine is started/restarted. In the case of Amazon Web Services (AWS), the script would be executed for an Elastic Compute Cloud (EC2) instance under the following scenarios:
- Stopped and started
- Restarted
- Terminated and started
Most importantly, the start-up script will be executed when an Amazon Machine Images (AMI) is created from an EC2 instance. When the new AMI boots up, the script gets executed without any manual intervention. This can be helpful in cases where we need to start applications on multiple machines and there is no downtime. This can be coupled with auto-scaling and Elastic Load Balancing (ELB).
Steps to create the script remains the same for all Linux machines.
- Log in to the root user
- Create a directory called instance-init in the root directory
- Create a script in this directory and write the commands to start the application/process or any things that need to be executed when the machine is booted. Let us call this script as sh
- Once this is done, save the file and type crontab –e. This will open the crontab file and at the end write
@reboot /path-to-instance-init-directory/init.sh- Now restart the machine for the script to be automatically executed
Since the new AMI is assigned a new IP address, it would not be present in the allowed hosts of the LeTo application and also when we have ELB for the servers, the IP address of the ELB needs to be present in the allowed hosts. Thus, we will not be able to access the application if the allowed hosts do not contain new IP addresses. To avoid this, we just remove all the allowed hosts from settings.py file which is found under /home/ubuntugui/leto/leto_instance/leto. The allowed hosts should allow all the address and this can be accomplished by
ALLOWED_HOSTS = [‘*’]
Steps to start SwiftCode and Leto when an EC2/AMI boots up:
- Login to ubuntu user of the EC2 instance using ssh
- Create a directory called instance-init in the root folder of ubuntu user
- Create a script called sh in this directory and write the following
#!/bin/bash
echo "Initiated the process for SwiftCode and Leto" > init.txt
cd /home/ubuntugui/leto/leto_instance
sudo nohup python manage.py runserver &
cd /home/ubuntugui/swiftcode/current_version/bin
sudo nohup bash swiftcode -Dconfig.resource=QA.conf -Duser.timezone=IST &
-
Now save the file and type
crontab –e
This will open the crontab file and add the following at the end
@reboot /home/ubuntu/instance-init/init.sh
- Now restart the machine or create a new AMI. When the machine is restarted or the new AMI boots up, the SwiftCode and Leto application will be started on the new machine.
Ops:
The below actions are carried out in the AWS Management Console. Also, note that this has been carried out in the Swift Code Stage and not the production instance for test purposes. The following steps are carried out to ensure HA is achieved:
- A snapshot of the required instance that contains the application is created (to be done when the instance is in the stopped state).
- An AMI is created out of the snapshot that was taken in step 1.
- A launch configuration is created using the AMI which was taken in step 2. This is to make sure the auto-scaling group will always take this launch configuration to spawn an instance
- An auto-scaling group is created based on the launch configuration mentioned in step 3. Important things are the Availability Zones they have to launch instances in and the VPC/subnet.
- Auto Scaling is created such that there will be a VPC that will have two subnets and each instance will launch alternatively in the availability zone as per the desired, maximum and minimum instances we require.
- The security groups for each of these AWS instances should make sure that they accept requests from the ELB and also from the RDS
- An elastic load balancer should be created with a rule stating any traffic from the internet on port 80/443 should forward it to the AS group which is listening only to the load balancer
- Use Route53 to map the ELB DNS to a public IP address so that users can use that Alias name to browse to the web application hosted.
- SNS – Simple notification service is subscribed where we create alarms such that if the collective CPU utilization of instances is more than 75% one or more instances are launched to effectively handle the load. There is also a scale down policy that says if the collective CPU utilization is less than 10% then one or more instances will be removed from the production environment until this condition fails or it reaches the desired limit.
- The RDS instance can also be given the option of multi-AZ deployment which creates a backup for the database.
- Since the instances are not assigned a Public IP directly we will create another EC2 instance in the same VPC where the auto-scaling groups create the instance so that we can use this instance as a Bastion host to remotely connect to the instance in case the application service is not working properly or in a hung state or to make any changes on a per-instance level. Making any changes on any instance is not recommended since any change on the instance level will not be updated at the AMI level.
In case we need to do patching of the instance, we have to terminate an instance and the Auto Scaling group will automatically launch an instance that is updated to the latest version. This is taken care of by AWS.
If the developer wants to launch a new version of the code (sprint) we can use the stage AMI to attach it to the auto-scaling group which will launch an instance with the new application changes. During this process, we can minimize the downtime drastically as the users can continue to use the old application while we launch the new one into production and make a cut over without any intervention. This is dependent on how the application also works since each application will respond differently.
References and further reading
- Implementing Cloud Design Patterns for AWS (book)
- Building Linux Clusters (book) by David HM Spector
- http://docs.aws.amazon.com/AWSEC2/latest/UserGuide/creating-an-ami-ebs.html
- http://docs.aws.amazon.com/AWSEC2/latest/UserGuide/ec2-increase-availability.html
- http://docs.aws.amazon.com/elasticloadbalancing/latest/classic/elb-getting-started.html
- https://aws.amazon.com/about-aws/whats-new/2013/05/30/amazon-route-53-adds-elb-integration-for-dns-failover/
- http://docs.aws.amazon.com/AmazonCloudWatch/latest/monitoring/US_SetupSNS.html
- http://docs.aws.amazon.com/AmazonRDS/latest/UserGuide/Concepts.MultiAZ.html
Disclaimer
This document is provided for informational purposes only. It represents AWS’ current product offerings and practices as of the date of issue of this document, which are subject to change without notice. This document does not create any warranties, representations, contractual commitments, conditions or assurances from AWS, its affiliates, suppliers or licensors. The responsibilities and liabilities of AWS to its customers are controlled by AWS agreements, and this document is not part of, nor does it modify, any agreement between AWS and its customers.
Special thanks
This post was contributed by Pavan Kumar A of BETSOL.
Questions or comments?
Please hit us up below in the comments section! Thanks for reading.