DevOps, it’s a hot trend in computing, it’s the new buzz word and everyone’s talking about it. There isn’t a single agreed-upon definition of DevOps but we like to think of it as the practice of IT operations and development engineers participating together through the entire service life cycle, from design and development process all the way to production support. Continuous integration and delivery or CI/CD is one of the most important parts of DevOps.
Create a Continuous Integration and Continuous Delivery Pipeline
In this blog post, you’ll learn how to create a CI/CD pipeline for applications built to run on Dockers using Jenkins and Kubernetes. Our goal would be to automate the below process –
- Checkout code
- Compile code
- Run test cases
- Build a docker image
- Push image to docker registry
- Pull new images from the registry
- Deploy and manage images and containers
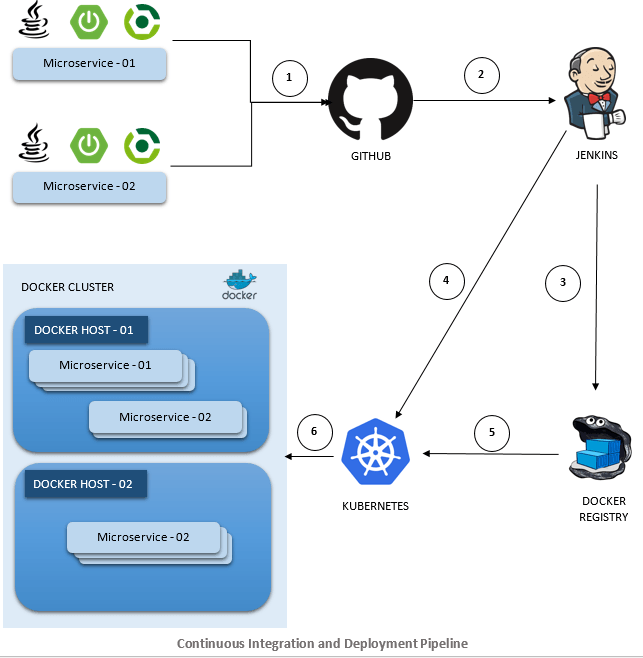
The image below shows the CI/CD pipeline and the various tools involved. The application used as an example [but not strictly limited to] in this tutorial is a simple web service written in Java using the Spring Boot framework with Maven being used as a build tool. The various stages in the pipeline are shown in the figure below –
- Code changes are committed to the version control system – GitHub
- Each commit to GitHub automatically triggers Jenkins build. Jenkins uses Maven to compile the code, run unit test and perform additional checks – code coverage, code quality, etc.
- Once the code has been successfully compiled and all the tests have been passed. Jenkins builds a new docker image and pushes it to the Docker registry.
- Jenkins notifies Kubernetes of the new image available for deployment.
- Kubernetes pulls the new docker image from the docker registry.
- Kubernetes deploys and manages the docker instance/container.
Tutorials
This blog post will not cover how to install and setup up Jenkins and/or Kubernetes cluster. There are numerous tutorials available on how to on different operating systems and platforms. For a quick and easy setup, this tutorial by google cloud is recommended.
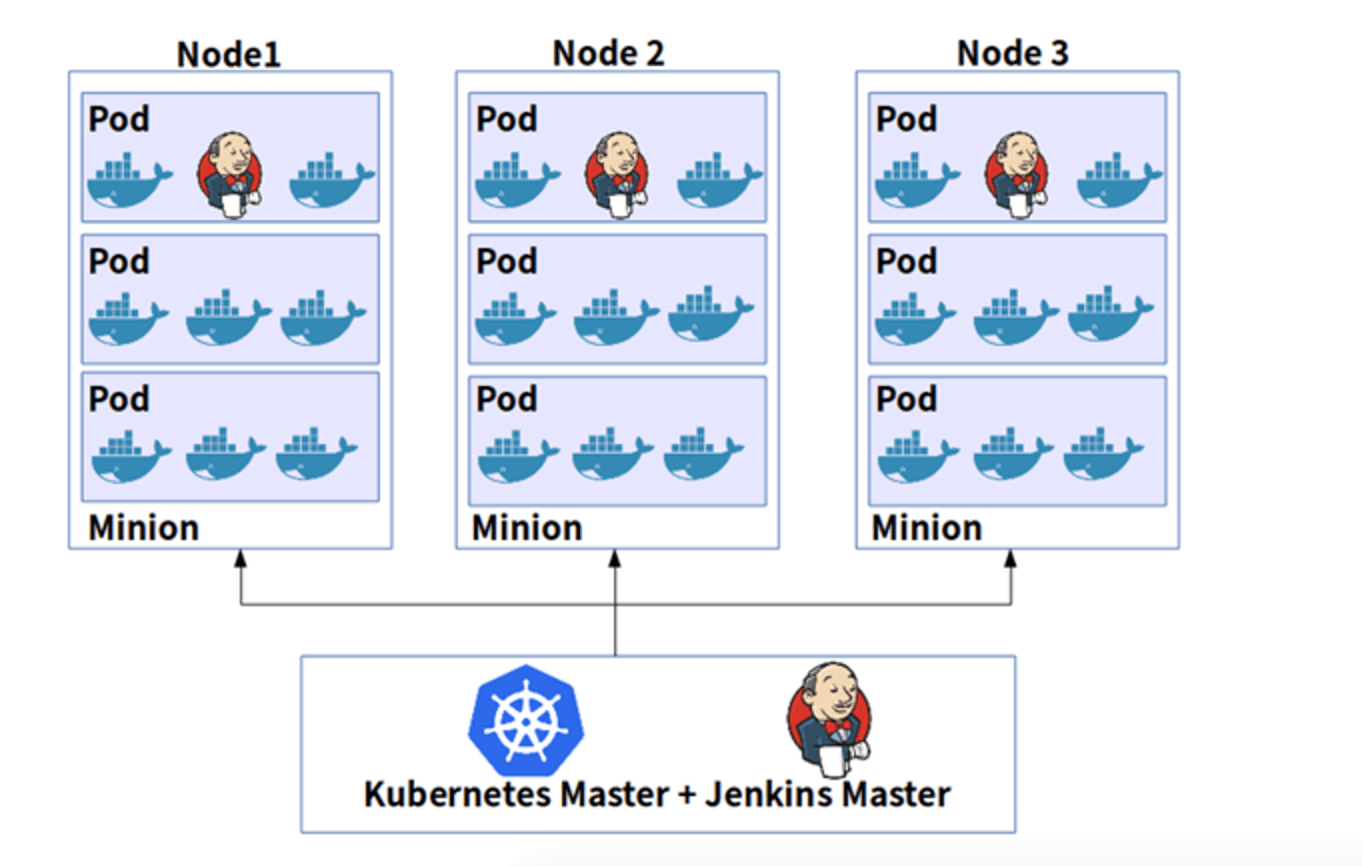
If you followed the above tutorial then your setup consists of a Kubernetes master node with one or many child nodes. You’ll also see that Jenkins is set up to run inside a Kubernetes Engine or Kubernetes cluster, this reduces the compute resources needed for CI/CD.
Once you have successfully set up the environment, the next step is to configure Jenkins to complete the setup. To do so, please follow the instructions here.
As shown in the architecture diagram above, Jenkins helps in achieving the following steps:
- Compile Code → Dockerfile
- Run Unit and other test cases →
- Build the docker image →
- Push the docker image to registry → Jenkinsfile
- Notify Kubernetes of the new image →
Dockerfile
Instructions for Jenkins to execute for steps 1 and 2 are specified in Dockerfile. Dockerfile consists of commands to build and run the microservice. Optionally, we can also include commands to run unit tests and perform additional checks.
Create a new file and name it Dockerfile. Place the file under the project’s root folder. A sample docker file having the instructions for building the microservice that uses maven as the build management tool is provided below.
#Docker base image : Alpine Linux with OpenJDK JRE
FROM openjdk:8-jre-alpine

#Check the java version
RUN ["java", "-version"]

#Install maven
RUN apt-get update
RUN apt-get install -y maven

#Set the working directory for RUN and ADD commands
WORKDIR /code

#Copy the SRC, LIB and pom.xml to WORKDIR
ADD pom.xml /code/pom.xml
ADD lib /code/lib
ADD src /code/src

#Build the code
RUN ["mvn", "clean"]
RUN ["mvn", "install"]

#Optional you can include commands to run test cases.

#Port the container listens on
EXPOSE 8081

#CMD to be executed when docker is run.
ENTRYPOINT ["java","-jar","target/recruitment-service-0.0.1.jar"]
Jenkinsfile
Instructions for Jenkins to execute for steps 3, 4 and 5 are specified in Jenkinsfile. A Jenkinsfile is a text file that contains the definition of a Jenkins Pipeline and is checked into source control. Create a new file and name it Jenkinsfile. Place the file under the project’s root folder. A sample Jenkinsfile which implements three-stage continuous delivery is provided below. For more information click here.
node{

  //Define all variables
  def project = 'my-project'
  def appName = 'my-first-microservice'
  def serviceName = "${appName}-backend"
  def imageVersion = 'development'
  def namespace = 'development'
  def imageTag = "gcr.io/${project}/${appName}:${imageVersion}.${env.BUILD_NUMBER}"

  //Checkout Code from Git
  checkout scm

  //Stage 1 : Build the docker image.
  stage('Build image') {
      sh("docker build -t ${imageTag} .")
  }

  //Stage 2 : Push the image to docker registry
  stage('Push image to registry') {
      sh("gcloud docker -- push ${imageTag}")
  }

  //Stage 3 : Deploy Application
  stage('Deploy Application') {
       switch (namespace) {
              //Roll out to Dev Environment
              case "development":
                   // Create namespace if it doesn't exist
                   sh("kubectl get ns ${namespace} || kubectl create ns ${namespace}")
           //Update the imagetag to the latest version
                   sh("sed -i.bak 's#gcr.io/${project}/${appName}:${imageVersion}#${imageTag}#' ./k8s/development/*.yaml")
                   //Create or update resources
           sh("kubectl --namespace=${namespace} apply -f k8s/development/deployment.yaml")
                   sh("kubectl --namespace=${namespace} apply -f k8s/development/service.yaml")
           //Grab the external Ip address of the service
                   sh("echo http://`kubectl --namespace=${namespace} get service/${feSvcName} --output=json | jq -r '.status.loadBalancer.ingress[0].ip'` > ${feSvcName}")
                   break

        //Roll out to Dev Environment
              case "production":
                   // Create namespace if it doesn't exist
                   sh("kubectl get ns ${namespace} || kubectl create ns ${namespace}")
           //Update the imagetag to the latest version
                   sh("sed -i.bak 's#gcr.io/${project}/${appName}:${imageVersion}#${imageTag}#' ./k8s/production/*.yaml")
           //Create or update resources
                   sh("kubectl --namespace=${namespace} apply -f k8s/production/deployment.yaml")
                   sh("kubectl --namespace=${namespace} apply -f k8s/production/service.yaml")
           //Grab the external Ip address of the service
                   sh("echo http://`kubectl --namespace=${namespace} get service/${feSvcName} --output=json | jq -r '.status.loadBalancer.ingress[0].ip'` > ${feSvcName}")
                   break

              default:
                   sh("kubectl get ns ${namespace} || kubectl create ns ${namespace}")
                   sh("sed -i.bak 's#gcr.io/${project}/${appName}:${imageVersion}#${imageTag}#' ./k8s/development/*.yaml")
                   sh("kubectl --namespace=${namespace} apply -f k8s/development/deployment.yaml")
                   sh("kubectl --namespace=${namespace} apply -f k8s/development/service.yaml")
                   sh("echo http://`kubectl --namespace=${namespace} get service/${feSvcName} --output=json | jq -r '.status.loadBalancer.ingress[0].ip'` > ${feSvcName}")
                   break
  }

}
Kubernetes
Kubernetes, remember, manages containers. Kubernetes relies on a YAML file for information about the containers, replica sets, etc. for deployment. This file is named deployment.yaml. The file can be under any path inside the project’s root folder, just remember to update the path for deployment YAML in Jenkisfile.
apiVersion: apps/v1beta1
kind: Deployment
metadata:
  name: recruitment-service-deployment
  namespace: development
  labels:
    app: recruitment-service-app
spec:
  replicas: 4
  template:
    metadata:
      labels:
        apps: recruitment-service
    spec:
      containers:
      - name: recruitment-service
        image: gcr.io/bats-qa/recruitment-service:development
        ports:
        - containerPort: 8081
If the number of replicas is more than 1 then a load balancer is required. In Kubernetes, we need to define this a Service. A sample Service YAML file for creating a load balancer is specified below. Similar to deployment.yaml file, this can be placed anywhere inside the project’s root folder, but just remember to update the path for Service YAML in Jenkisfile.
apiVersion: v1
kind: Service
metadata:
  name: recruitment-as-a-service
  namespace: development
spec:
  ports:
    - name: http
      port: 8081
  type: LoadBalancer
  selector:
    apps: recruitment-service


