Over the past few years, software deployments have become easier due to the popularity of containerization.
Even though deployments may be easier there are always ways to optimize.
An ideal scenario would be to have very little downtime and deploy in an easier way.
What would it look like if a person could use their mobile phone/smartwatch and say “OK, Google, DEPLOY” and the application deploys automatically? Time saved is always a valuable thing.
Overview of Process to Make Deployments Faster and Easier
- First, open your smartphone/watch, say “OK, Google Deploy.”
- The IFTTT will then link your Google Assistant to Slack
- The Slack application will look for the keyword ‘deploy’ and it will trigger the script.
- The script will then take on the job of deploying your application.
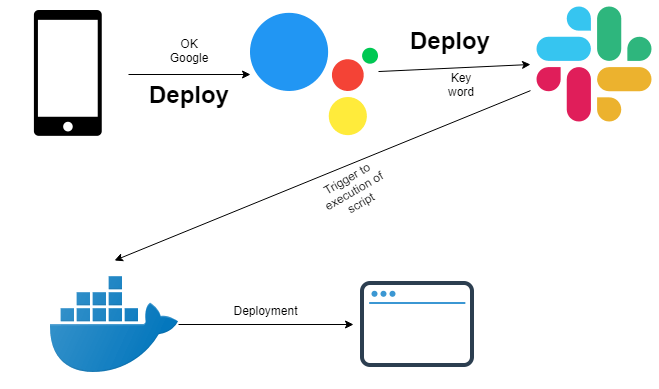
Now, you are able to deploy the application using your voice.
Technologies Used
- Docker
- Docker Swarm; alternatively, you can also use Kubernetes.
- Slack
- IFTTT
- Shell Scripting/ Bash Scripting
Normal Deployment Using Docker
A swarm is a group of machines that are running Docker and joined into a cluster. After that has happened, you continue to run the Docker commands, but now they are executed on a cluster by a swarm manager.
A docker stack is a group of interrelated services that share dependencies and can be orchestrated and scaled together.
To sum up, you can have many containers running at the same time and have a docker-compose.yml file which has what all the images need to be used and a docker image can be built with the help of a docker file.
As a standard practice, you can usually pull the code using GitHub/bitbucket/GitLab and copy whatever you have pulled using the COPY or ADD command.
Using the code and dependencies- you can begin to build the images.
When you build a new docker image a tag is given to it along with the repository name (remember, some images are private and some images are public.)
Public images can be downloaded by anyone and are global. The private images need a docker login with suitable creds for you to use the image.
The docker-compose.yml will have the configuration of all the images that it runs as services.
An ideal web-app can have the whole component (server+ client) running and might have a database along with it. So suppose it will have two images in it- one for web-app and one for databases.
The docker-compose.yml is started in stack mode by using docker stack deploy -c docker-compose.yml{anyname}
Link Slack, the Application, and Google Assistant
Make use of Slack Bots to connect to your application and use IFTTT to connect your Google Assistant/ OK Google.
Building a Docker Image Using Docker File
As mentioned earlier, your docker file should have a copy command which copies your code to the docker image.
Now let us go through on how to build the docker image using the docker file.
The standard command for building an image using docker file is:
docker build -t repository_name: tag_name .
The repository name should remain the same and the name should have little change (i.e adding a number and incrementing it every time) so that the image name is updated in the docker-compose.yml file.
Make sure the number increments every time you execute the script. In our case the execution of the script will be triggered via Google assistant, linking to Slack and Slack’s API is linked to the application.
For example: Suppose your repository name is ABC, the tag name is XYZ, you can continue this every time script the is executed.
docker build -t abc:xyz1 .
docker build -t abc:xyz2 .
To generalize, we can add a variable instead of a number.
Example: docker build -t abc:xyz{variable} .
Shell Script for Incrementing the Variable Number and Running Docker Build
Suppose n is the variable name and we assign it to a starting number and write the script to increment and update the variable every time in Docker build, and every time script is triggered.
n=1; #the variable that we want to be incremented
next_n=$[$n+1]
sudo sed -i “/#the variable that we want to be incremented$/s/=.*#/=$next_n;#/” ${0}
The above script will make sure the variable n is increased every time the script is executed/triggered. Later you can use the same variable to append to tag_name of the docker build.
docker build -t repository_name: tag_name$n .
Example of this when it is executed (suppose your repository name is ABC, the tag name is XYZ)-
docker build -t abc:xyz1 . (as n the variable will be 1 the first time)
docker build -t abc:xyz2 . (as n the variable will be 2 the second time)
The docker-compose.yml File
Docker Compose is used to run multiple containers as a single service. The docker-compose.yml file has the code where multiple containers can be configured.
A sample of docker-compose.yml files can be found here.
The image name should have the name of the image which you have recently built.
You can handle the replacement of the name inside docker-compose.yml by using a basic find and replace command using sed.
sed -i ‘s/old-text/new-text/g’ docker-compose.yml
The Final Execution
Your script now contains: incrementing the variable, building docker image using the docker file, and changing the latest image name in the docker-compose.yml file.
To run the application in docker stack mode, simply use:
docker stack deploy -c docker-compose.yml {anyname}
This will start the application by parsing every content from the docker-compose.yml file and your application is up.
Be sure to also check out our DevOps Using Jenkins, Docker, and Kubernetes blog post